Description
About This Video
Transcript
Read Full Transcript
This is a practice to open up the thoracic cavity and really get into shoulders and ribs. And you might be wondering, what does that have to do with my pelvic health? The whole canister of the body, if we think of it all the way from pelvic floor to the diaphragm and around to the sides. If we have an increase of pressure in that canister, it most often goes to the abdomen, to the pelvic floor, or to the spine. And for women, most often it's the pelvic floor.
So if we can make a little more space in the upper body, in the upper part of that canister, then we can decrease the intra-abdominal pressure. We can decrease that pressure down to pelvic floor, to the spine, to the abdomen. So this is a practice for that. First come into table, pose, bring knees underneath the hips, hands underneath the shoulders. Exhale and curl into a Halloween cat and start to press back, almost like you're going to sit back on the heels, but we're not going all that far back.
When you inhale, really lengthen in your table, feel like you can breathe into the crown of the head, growing tall in that table. Next exhale, curling and pressing back like you're going to sit back towards the heels, even though we're not sitting back on the heels. On the inhale, moving back to table. So really allowing the breath to move you here. Exhale curling and pressing back towards the heels.
Then inhale, lengthen at table. And then moving to the side, so we'll lower down onto the side, support the head with the hand. Knees are bent, hips are stacked, knees are stacked here. Bring one hand onto the hip and then feel around for the glute muscles. So the muscles on the bottom.
Really, really very subtle, hardly any lift here. See if you can lift the knee up and notice, do the glutes start to fire? And if they're not, can you massage around a little bit and wake them up? You should be able to feel them firing. You can lift the knee a little bit higher if you'd like.
It can help to do that on the exhale. And then lower on the inhale, so exhale as you lift. And lower on the inhale, amazing. Maybe starting to feel that in the glutes now. And then see what it's like if we lift the knee and the foot.
That might change it a little bit. Are the glute muscles still firing? Good. And then lengthening that bottom arm out. I'm going to do a nice, actually my favorite thoracic twist.
Bring the hand back behind you. I'm going to reach back for a block to support my knee. So if you have a block, or a blanket, or a bolster at home, you're going to bring the block underneath that top knee, that top leg, to support it there. Top arm comes back behind the head, and we make the head really heavy on this arm that's on the floor. On the inhale, opening up, and on the exhale, closing in, rolling the forehead onto the floor.
As you roll, let the head be really heavy, it rolls along, massages that arm. Inhale to open, and exhale to close. Now, focusing on the upper body, the ribcage, exhale, forehead rolls down towards the floor. And the inhale opens that twist. A couple more times here.
Really sink in and enjoy. And then coming back to center, we'll use the hands to bring us up to sitting. Switching to the other side. So again, we support the head with the hand, or a pillow. Stack the knees here, stack the hips, find the glute muscles, and then see what it's like just to hover the knee a little bit on the exhale, inhale, and lower the knee.
Does this side feel any different? Do we feel the muscles engaging? If they're not, can we dig around a little bit? It's like a little massage for the glutes. And then we ask them to work here.
And then see what it's like if we hover the leg. So again, the effort on the exhale when we hover the leg, the inhale lowers the leg. Good. You'll know those muscles sometimes get a little bit tired here. Those are the real supporting muscles.
They really help the hips, the pelvis. Okay. And then relaxing down, we'll extend that bottom arm. I keep forgetting to bring my block with me. We're going to bring the block or pillow or bolster underneath that top knee and extend the bottom arm out.
Bring the top hand back behind the head to support. On the inhale, we'll open, let the head be heavy. On the exhale, let the head roll on that arm, closing in on the exhale and inhale to open. Letting the breath move you. Noticing if this side feels different than the other side.
Amazing. Bring hands then to bring you up to sitting. Bring the block with you. And if you have a pillow or a blanket, you're going to roll that up or support, roll that up or use it as a support for the spine. If you're really tall, then you'll use the block for me.
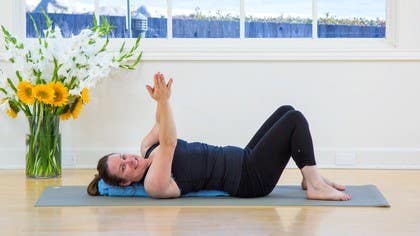
I'm guessing that I'm not going to reach to the block, but who knows? I grew taller. We'll start to lower the spine down onto the blanket so that we're sitting off so that the low back, the bum, is not on the roll of blanket or the pillow. Reaching arms up towards the sky. Hands come together here.
Exhales are straight and it's like we've just glued the hands together. We're going to slowly, on the exhale, start to tilt these straight arms to one side, inhale back to center, exhale to the other side. It's great to start with just a little bit of movement and see because it can be a little more challenging to come back to center than it is to go out away from center. This is a great pose if you're doing a lot of work on the computer, driving, if you have tension in the shoulders. The head can move with the upper body here and we'll just notice trying not to slide the hands, trying not to bend the arms just for this movement.
Good, and then we'll come back to center. Lower the hands down and just notice for a moment. Let the shoulders get heavy. It's one of my favorite spots here to hang out when you have the opportunity to just allow the heart center to open. Good.
Then bringing the arms down to the sides, along the sides, really straight arms, palms are facing in towards the center line of the body. Lifting the arms up on the inhale, we're going to see and notice where the rib cage lifts. Then exhale, lower the hands down. We'll make the movement more about the shoulders here. Let the heart be heavy.
Let the rib cage be heavy. Right about there is where I am feeling. Just a little past the center line, I feel like my ribs want to do it. I'll show you what that looks like. When the ribs do it, it would be like the ribs are moving instead.
I don't know if you can see that, but I can definitely feel that it's a different thing than the shoulders. The shoulders is very subtle. There's this point where I can make the heart heavy there and sink in. It's kind of about, how can I do a little less here to allow the thoracic to open? Bringing the hands up towards the sky, hold on to opposite elbows here.
Let the shoulder blades soften down and just finding this elbow window, I like to call it. We've made this window and with the breath, we'll move it side to side. Press breath, and then if you want, the knees can go in the opposite direction. We windshield the knees, a little wobbly with the blanket, but it feels so good on the shoulders. No more times here.
Then we'll bring everything back to the center, rolling over to one side, move the blanket and the block out. See if you can then come back to the back, just to notice how is that feeling on the back there. It's really taking that in for a moment. Bringing hands towards the hip bones, then we're going to do a little pelvic tilt. Tilting the pelvis away on the inhale, tilting the pelvis towards you on the exhale, or another way to say that is tilting the pelvis away or pressing the tailbone down into the earth, tilting the pelvis back towards you, lifting the tailbone back towards you.
We find a little pelvic tilt front to back, good, and then bringing hands towards the hip bones again, we'll imagine that we're rolling a marble from side to side, looking up towards the sky. My knees, I'm noticing right away, they want to help and move, but let's see what it's like if I just ask the pelvis to do the movement. I feel like my face wants to tighten. What if we soften the face, find a smile? So we've kind of mapped out four points here, can we make a circle now from those four points?
So the top, where we lift the tailbone off, the side, pressing tailbone down, other side, and around. So we're making this circle. If the marble analogy helps, you can imagine a marble rolling around on a clock or on a compass, reversing the direction of your circle. Great. And then coming back to center, hugging the knees in, rocking a little bit side to side, and finding your version of happy baby.
So it might be here holding on to the knees, might start to hold on back behind the knees, maybe holding on to the feet if you would like to. So feet are up towards the sky, knees are bent. You find a little happy, happy rocking side to side. Lower the feet down, plant the feet on the earth. Check in and see, would you like to extend the legs out to straight for your relaxation or keep the knees bent?
Connect with the breath, soften the face, the eyes. See how the breath feels now. Is there a little more space there for the breath? Noticing if there's a place where you can soften or wiggle around, find some comfort. Only nurturing self here.
And staying here as long as you need to. When you're ready, starting to move fingers and toes, maybe circle wrists, circle ankles, inviting in a little more breath, lengthening, reaching the arms up overhead, reaching out through the feet, taking up lots of space. You're ready, rolling over to one side. Pausing here for a moment, really feeling gratitude to self. Bringing yourself up to sitting.
Thank you so much for practicing. I hope that you find a little more space in the shoulders, in the upper body, in the whole inner unit. Thank you. Thank you so much.
Yoga for Women's Health: Yoga For Pelvic Health
Comments
You need to be a subscriber to post a comment.
Please Log In or Create an Account to start your free trial.
