Description
About This Video
Transcript
Read Full Transcript
(crashing waves) Hi, thanks for tuning in. This practice is about finding ease and mobility with stability beneath the surface. Neck, shoulders, upper back. And the truth of it is, if your upper back is stiff, your neck is gonna be stiff. If your shoulders are stiff, your neck is gonna be stiff.
So, here we go. I'm gonna start out by lying down. Support for the head is nice for this. So, knees are bent with feet on the floor, feet on the mat. Lying on your back.
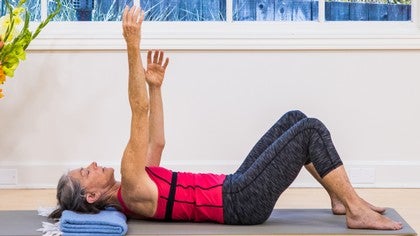
And then, it's quite simple, you just reach your arms up, and you're gonna be reaching one side at a time, so as I reach with my left arm, just straight up towards the ceiling, I'm actually letting my head turn and the upper back peels of the the floor and then down again. Lifting up with the right arm, letting my head turn a little bit away, straight up and down. Each time we lift, we allow the shoulder blade to move away from the spine and up towards the fingers. So now as I lift up through the right arm, I'm gonna just give you a visual, it's like the whole shoulder blade and all the flesh of the upper back reaches away from the spine and up towards the fingers. It's a broadening of the upper back.
And it'll pull your neck a little bit into a back bend and you can also let your head turn with that, if that's comfortable. You can see the not reaching arms is quite relaxed. (breathing in and out) Always helps to coordinate with breath, so inhaling when your in center, exhale reach. (breathing out) Inhale, come on back down. Exhale, reach.
Feel the shoulder blade widening. Inhale, come on back down. Exhale, reach the other side. Broaden, lift the shoulder blade along with the reaching arm, exhale reaching the right arm again. Inhale, come down.
Now, pause here, take a breath. We're just gonna do a couple more. This time, you're gonna experiment with inhaling as you reach up. So, inhale, let the breath out. And then inhale, reach.
Expanding the chest with the reach. Exhale, come down. Inhale, reach. Expand, and then come down. One more each side.
Inhale, reach, broadening, letting the head turn if it wants, exhaling down, inhale, reach. Good. Rest your arms, if you notice how you feel. I feel like I crawled up on the blanket, so I'm inch-worming down a bit. This next piece follows nicely from that one, because we're gonna be reaching across the body, and really opening the upper back.
So, we've begun the work of that. And the first couple times that we do this, it's gonna be kind of Feldenkrais style, and if you don't know what that is, you will after we do this. Now, as I lay my head down here, I notice that the top of my head is lower than my jaw, and that means the neck is in a pretty deep side bend and I'm feeling like that's not quite enough support. So, I'm gonna take this blanket and give it another fold. And that feels better.
And if you find that you need to have your head supported up this high, that's quite alright. Just be sure that you leave plenty of tail back, 'cause you're gonna be rolling backward and you want to be able to have support with your head as you do that. So, we tuck the legs up so that they're coming straight out from the pelvis and the arms are coming straight out from the upper body, they're not up or down. Resting your head, and then the palms are touching each-other and in the Feldenkrais like movement, you let your elbow bend, your shoulder, elbow reaches back and that allows the shoulder to open. And then you just just find out, and you're actually letting the pelvis turn too.
Big breath, exhale, come back slowly with control. Not too fast. Okay, so we're gonna do this several times and you can see I'm extending my hand further out, turning my head down on the blanket. Coming back, just keep the breath moving. At some point I'm dragging the hand up the arm and at some point you have to let the hand go, and then the elbow reaches back, maybe that's as far as you want to go.
Oh, I feel a little, a little tightness in my neck, here. I think I'm gonna just honor that, it doesn't have to be banging on the door, it can just be tuning in to the subtle barriers is extremely important. So, as I go back again this time, I'm just explore and see if that barrier is still there. Actually it's not. So I was able to go back further this time.
Sometimes I've had to go back three or four times to release that barrier. So, this time, last one of the the Feldenkrais like movements and you can see, well you will be allowing your pelvis and leg to turn back in the same direction that you're turning your arm, head and arm, chest and pelvis, everything is turning towards the area behind you. And now we're going to do a more stabilizing maneuver for the pelvis, which because we're not gonna let the pelvis tip back with twist, it's going to bring more of the stretch into the upper back. So the rib cage and the upper back and all the little tiny connections of the spine can be quite tricky to loosen. So we've started that loosening with the Feldenkrais, now we're gonna lift the top hand, which is my left hand in this instance.
And I'm keeping my eye on the hand, and I'm moving very slowly. And once the arm is approximately vertical, maybe a little beyond vertical. I'm gonna take stock, and I'm actually gonna turn my head, peek back up. I let my pelvis turn so you can reach down with the right hand, and keep the right hand on the knees. And if the left hand creeps back beyond, if the left knee and thigh creep away from the hand, you know that your pelvis is turning.
So let's keep that left knee and touch with the hand. I'm not gonna make my neck turn any farther than it wants, I'm taking the arm back to wherever I start to feel a barrier, which is about here. So, I'm not making my arm rigid, I'm keeping it, the place where the arm connects to the shoulder, the shoulder joint's soft, the elbow is soft, the fingers are soft. Maybe some stretching but a gentle stretch. And I'm keeping in tune with my pelvis by keeping in tune with whether or not this left knee is going back.
So now, a few deep breaths. You can feel the tightness of the rib cage and the upper spine as you breath in because it's hard. It's a little bit, it's a certain effort involved to breath deeply. As long as there's no pain in this barrier. There's a definite barrier here, but it's not a pain barrier.
It's just kind of like, that's as far as my body wants to go kinda barrier. This is the kind of barrier that with time, you can nurture without hurting yourself, you can nurture and just hold the space for what is, as in this is as far as my body goes right now. And because you've got the weight of your arm back here and because you're breathing and releasing, that barrier gradually, gradually inches away. And I can feel it, I can feel my body going further back. It's not a matter of dropping the arm, it's a matter of allowing the chest and the back to release.
I'm even able to turn my neck a little further, but if I weren't, I wouldn't do it. So, a couple more breaths, feeling the stability in the pelvis, where you're possibly working belly, whatever it is. And really tuning into letting that upper back go. My last breath. And then I'm gonna turn from my body everything at once, arm, upper back, head and neck.
Coming down, letting the two hands meet and just hang out here at the end point, which is the beginning point. T.S. Elliot says in his long poem The Four Quartets, he said, "The end of all our explorations "is to find ourself where we started "and to know the place for the first time." Okay. So, we're getting ready to roll over and do the second side. So now I'm going to be facing away from you to start with, to do the second side. But it'll give you a view of my back.
So you turn over, you place your head on the blanket again, making sure that you have enough height to not feel neck pain. You stretch your arms out, tuck your legs up so their 90 degree angle out from your hips. And then we're gonna softly and gently with bent joints, and allowing the hips to turn. Can you see how I'm turning my hips back here? And then you're gonna be on the floor doing it.
So gosh, this side just lets me turn all the way back without much barrier. It's amazing. So, turning back very slowly, and then down, the nose goes down towards the floor, so my right hand has reached way beyond the left. And then gliding my right hand back over my forearm and elbow, the elbow lifts, arm stays bent, pelvis and spine, head and neck turning. And then at the end of that, bending the elbow again, coming back. It should come as no surprise to me that the two sides are different. (chuckles) And hopefully you're not too surprised by it either.
So as I'm dragging back, just one more of this Feldenkrais style, I'm really letting the hip turn with the spine, it actually helps the spine release. Arm stretches back, and then bending the elbow and coming back, tracing the same line, more or less. Pausing to change modes of movement. Now, I'm going to restrict the movement of my pelvis and I'm putting the left hand on the knees so that I can feel if that's happening. Right hand comes up, I'm following it with my gaze, so watch your hand come up to the vertical or slightly behind vertical.
Elbow can be bent. Sometimes I like to lift the head and lengthen the back of the neck here. That feels better. Before I go further, I'm checking the knee. So, check your knees.
I can feel that my right knee has come back, what about yours? (laughs) Sometimes holding the knees is a good way to go. So, taking a deep breath, dropping the upper back as much as it will go. Now I'm noticing that ease I had when I turned the pelvis is not present when I don't turn the pelvis. So that really reveals something. What, you might wonder.
Well, tightness in the rib cage, tightness in all the little tiny spinal connections. I don't feel like it's attached to shoulder tightness, maybe a little. So breathing. And I'm actually resisting going down with my arm. I could drop my arm and get really excited about, oh I really want my hand to touch.
But that would be a strain, so no strain brings more gain. Breath in. I'm sure Muhammad Ali would have thought of a number of cute little poems to go along with this by now. There's my bow to Muhammad Ali. Taking a deep breath, and allow it to fill your belly and your chest.
Exhale, release. And let the release be a sense of softening. Inhale into belly and chest. (breathing out) Releasing. Sometimes just focusing on releasing the breath I can feel it allows the back to start to release.
The back and the chest. I'm not racing ahead with the arm, please don't do that, just let the chest and the back move. So the first few times you do this, you might only wanna, we've been doing it for more than a minute now, probably two. But the first time, that might be too long. The first two weeks that I did this, a minute was plenty.
So I'm gonna assume that two is plenty. I'm gonna draw the shoulder blade down my back, that seems like that feels nice. Oh gosh. So, if on the other hand, you're enjoying, you know you're in the middle of a wonderful release and the body is just dropping and releasing, stay. â?« Stay â?« Just a little bit longer Okay, take a breath, come back.
Exhale. Back to the starting position, rest. (sighing) Very nice. And then after you've rested for two or three breaths, you can roll back onto your back. I feel like I don't need this head rest anymore.
And that's often what happens, is that when you first come in to the stretch, it's like, "Oh my god, I need lots of height here." And afterwards, it's like, "Oh, something changed here." Et voila. That's what we're hoping. (breathing out) Very good. So the last piece here is gonna be something called chin tucks, and I'm gonna roll over and show you what's involved inside the mouth with these chin tucks. So, before, when we're doing the chin tucks, it's basically lifting the chin and tucking it down. You won't be doing it in this position.
But I wanna show you what you're doing with your mouth. Once you lift your chin with the mouth closed, you'll open your mouth a little bit. I'm gonna open it wide so you can see my tongue. And you're gonna put your tongue on the roof of your mouth. Near the front teeth, you don't have to go way back.
Then relax the jaw, and you'll do the chin tuck. And then you relax the jaw and let go of the tongue touching the palate before you lift your chin again and open your mouth and tuck. Okay. So you don't have to open your mouth wide to do it, I was just opening so you could see my tongue. I'm gonna suggest that when you first do this, if I you feel like you need neck support, a little height with the head, to please give that to yourself.
You might like to use it the whole time. This height might not be enough. I've only got about an inch and half of height here. You might need two, two and half, three inches, so give yourself what you need to be comfortable in your neck in a position where your chin and forehead are at least in line with one another but the chin is not higher than the forehead. Okay?
So then we begin the chin tuck action. I like to inhale as a lift my chin, tongue on the roof of the mouth. Exhale, tuck. You're tucking a little bit beyond where your chin would normally be. Inhale, up.
Tongue to palate. Jaw soft. Tuck down. That's the exhalation. Inhale, lift the the nose and the chin, open the mouth just enough to get the tongue on the palate.
Relax your jaw, tuck down, then relax your jaw again and relax your tongue and lift your head, lift your chin. So you always let go of the tongue pressing on the palate before lifting your chin again. So you lift the chin, place the tongue, tuck the chin. The outside of the neck stays pretty soft, you're working on a muscle that's connected to the hyoid bone, and the central part of your neck. And when that muscle is gently worked like this, it brings a great deal of neck stability.
And these outer muscles don't have to try so hard to hold the head up. So we'll just do few more. You wanna work up to maybe three sets of 10, and then three sets of 15, and that should help. So inhale up, touch the tongue to the palate, exhale down. Relax the tongue, lift.
(breathing in) Tongue to palate, down. Relax the tongue, lift the chin. Inhaling. Exhale, tongue on the palate, tucking down. Relax the tongue, lift the chin.
Touch the tongue to the palate again, jaw slightly open, exhale down. Release the tongue, lift the chin. Touch the tongue to the palate, drop the chin. Okay, we're just gonna do one more. Relaxing the tongue, lift the chin, your chin, touch your tongue to your palate, tuck the chin down, and then relax.
So after I started doing this, I noticed a couple of things. I got really relaxed doing this. So a lot of the autonomic nerves which turn on the receiving, quieting part of the nervous system are based at the back of the neck and the skull. So I noticed a really deep calm coming, and I also noticed that when I got into my car to drive away, I no longer, first thing after putting my seat-belt on, wanted to get my head back on the headrest anymore. In fact, I noticed as I was driving that I was more comfortable with my head upright over my spine.
I thought that was great, so check it out. Thank you so much.
Yoga Rx: Patricia Sullivan
Comments
You need to be a subscriber to post a comment.
Please Log In or Create an Account to start your free trial.


