Description
About This Video
Transcript
Read Full Transcript
Oh, namaste, nice to have you here. This session will be focused on the shoulder movement and chest pliability is a key word you're going to hear me say over and over here. And that chest pliability is what allows us to open up the top spine and move these shoulders safely. So we're going to start on our back with legs out to the sides. We're going to use a block here to push down on.
Lie down on your back, bring the bottoms of the feet together, and the block will be overhead so that you can rest your interlocked fingers and hands on the block. Straight arms, that's a key component to this exercise. We press with straight arms down into the floor to feel the chest lift up. Let's try it together. Inhale, push straight arms and hands down into that block and feel those spinal muscles press open the chest.
We want the back to feel like it's arching up a little bit here. And that word again, that pliability is what we're aiming for. The ability to open, to move, to expand the chest. It's not uncommon for the elbows to want to bend so it becomes more of kind of a bicep press, a bicep curl into the block. We're going to try to keep the arms as straight as possible to get the best effect.
If you find your shoulders won't make it all the way down to the floor, to the block, you can either turn the block up at a higher level or stack another block on top so that your shoulders can easily make the distance. Let's do three more together. Press, release, inhale, press, release, last one, straight arm, press, release, bring your arms down, take a little pause, bring the legs together and we're going to work our way into cat and cow, actually cat and cow. We'll take the block away, cat and cow position, we're going to focus on the movement of the chest through the shoulder blades. Start by dropping the chest through straight arms and the shoulder blades collapse together.
Then press up through the shoulder blades, expand them wide apart, drop the head down. Once again, drop the chest through straight arms and feel the shoulder blades come together. Press up through, spread the shoulder blades, round back. I'll add a breath to it, inhale, collapse the shoulder blades, it's very tempting to bend the arms if you can keep them straight, try to keep them straight. Coming up, let's do three more together, inhale, shoulder blades together, exhale, shoulder blades up, spread, shoulder blades together and up, last one and spread and separate the knees a little bit, bring the toes together, sit back into an easy child's pose but with the arms extended here and if you find you cannot bring your head down to the floor, if the shoulders just don't permit it, you could bring a block underneath your forehead to support yourself so the shoulders don't feel strained and just resting in child's pose for a few breaths and we'll come up into standing.
For our standing shoulder sequence, we're going to be using this strap, so let's grab that strap and we'll start with our first pose. We'll take the strap behind the back and up as high as you can under the armpits, make sure the ends of the strap are equal length, we'll bring the right strap over the right shoulder and the left strap over the left shoulder, then behind the neck we're going to make a cross, you can see that here. If you lean to the side, we can tip that strap so it's out and free, I let it go behind the body and I capture it, same thing on the other side, I lean to the side, there's that strap just waiting for me, I'm going to let it go and then reach underneath and grab it. Now I can get to work, I get to pull down on the strap and you'll feel how that opens the chest beautifully, relax and we'll do it again. Pull down on the strap, you feel the shoulders are drawn back and open, chest, get that pliability we're working on in this session together, so important for the shoulders to have that chest be mobile, expansive.
Pull down on the straps and again feel the shoulders be drawn back, chest opens, let's do a few more together, pull back, good, we're going to add a little bit of neck work to this to further open up the chest, pull down on the strap, feel the shoulders are back, chest is up, then look up from the chest and then bring it back down, let's reset. Pull down on the strap, you feel the chest open wide and looking up and we'll do one last time, pull down on the strap, shoulders back, chest open and then from that top chest lift up the chin and then release and relax and we'll take the strap off and it's nice to just stand for a moment and feel the effect of the chest from that strap technique, how open and light it feels, recovering that awareness of how open the chest can actually feel. Our next technique, we'll take the strap behind the back and hold with the palms facing forward, see how my palms are facing you, your palms to face me. We'll start here with the hands at about hip width, we don't want to go much wider and straight elbows. Start by rolling the shoulders a little back and then pull the hands away from the back and release, learning to roll the shoulders and pull the hands back.
Simple technique but with profound results of being able to open up that chest wall, this is so important for backbends, again for the health of the shoulder, for strength in the shoulders and of course for posture. Try a couple more, start by rolling the shoulders back and then taking the hands a little bit off the back and last two, shoulders, release, one more, inhale, roll the shoulders back and then release. Next we're going to take the strap and make a loop out of it, we'll take the end of the strap, feed it through and back over the end and we're going to make a shoulder width loop. So that's about like this for me, shoulder width, take that loop behind you and feed the arms through, palms again facing forward, start by rolling the shoulders back as you learn in the last technique and now I'm going to push my arms out to the sides, I'm pointing with my fingers so you can see what out to the sides means because I can't move my arms while they're in the strap. So here I am, palms facing forward, I'm going to pull the hands apart and feel something very specific, feel how the shoulder blades press into the upper back, opening my chest and relax, we'll reset, let it happen again.
Roll the shoulders back, palms face forward, pull out with the arms and hunt for that feeling of the shoulder blades pressing into the top back which opens the chest and then ease off. We'll do two more together, palms facing forward, pull the arms out to the sides, look for that feeling again of the shoulder blades pressing into the upper back and last one, turning, press the arms out, feel the shoulder blades, you can move the hands off your back a little bit to get that feeling and then release and relax. The next step, we'll take the strap out just a little bit wider and hold with the hands behind the back, I'm outside of the loop now, separate the feet a little bit, bend the knees, fold the trunk and then take the arms over the top. People see this for the first time, they go, there's no way my body could do that, you'd be very surprised, we're just going to challenge it a few times, you bring the hands down and come up nice and easy. Let's try it again, bend the knees first, fold the trunk down and relax the back muscles so that the back rounds, then we'll take the arms up and over, hands back to the hips, come up nice and easy.
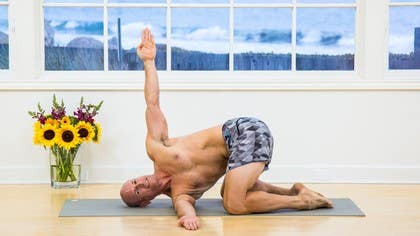
Two more together, bend the knees, relax trunk down, active arm pull overhead, come up easy and last one, here we go, fold, trunk over, arm action, come up nice and easy and take a little rest, roll the shoulders out, get a chance to feel now how your chest is after these few exercises together, remember that thing that I can teach you the most, the awareness, the ability to feel inside, we're going to take that strap loop and narrow it a fair amount so it's a quite tiny loop actually, 6-8 inches or so and we're going to start with that strap overhead, elbows bent, feet can be hip width or there's an even deeper experience with the legs together, then hook the thumbs in the strap and we're going to try to pull the strap apart and then ease off and if you watch my chest as I do this, you see that there's a response there, I pull out with the thumbs and elbows and here comes that chest again, that lift of the chest and then relax and again I pull out, chest comes up, this is that pliability, the mobility that is so important in the chest, great for the lungs, great for the heart, give space for the organs and of course functioning shoulders and relax, take it down, we're going to take that one more step, take it up another level and then we're going to get in some deeper poses, this time with a strap overhead, arms straight up, same idea, we're going to pull those thumbs apart to get that chest action, you can see the chest lifting and then I ease off, chest goes down, once again I'm pulling my arms apart out to the side to get that chest feeling and ease off, we'll do two more together, pull the thumbs, chest opening and come on down, one more, pull the thumbs, chest opening and release the arms down. Our next pose is Gomukhasana, known as cow face pose, we're going to start with a strap in the right hand, take the strap behind you and capture it with your left hand at about your lower back level, so the lower, the left hand is around the lower back, we don't need to link the hands together, the first thing to notice is the placement of my right arm and you'll notice the elbow is out to the side away from my face, we want to actually bring that arm, swing the elbow in close to the face, that's important for the function of the shoulder, let's do that together, let the elbow go out and then draw that elbow back in close to the face, I'm going to show you another angle of this so when we do the work together you can see how to use the arms, we're going to pull the elbow in again close to the face, now I'm going to work with my lower hand, I pull down with the lower hand and lift the right elbow up and then I'll ease off, we'll do it twice more together, pull down on my lower hand, right elbow in and up and you can see how that opens up your chest, let's do it one more time, we'll roll the elbow in, pull down on the left hand, right elbow up to get that chest opening and then ease off and relax and we'll do the second side, left hand holds the strap, we'll bring the strap around the back, right hand grabs low, about the lower back level, you don't need to go up much higher for what we're doing today, see how the elbow naturally wants to be out to the side, we'll roll it in towards the face and then pulling down on that strap with the right hand, you can see how the chest is opened here and we'll show it from this side, pull down on the strap, elbow in close, lift the left elbow up and what we're doing with this action is you pull down with the right hand and lift with the left elbow, the shoulder blade, the left shoulder blade is what gives that space in the chest, when we get into deeper backbends that is a critical action we need to know for the openness of the chest and the safety of the shoulders and then ease off and relax, let's put the strap away for a moment and just feel what the effect is of those poses, stand for a moment, go within with that awareness and consciousness, feel the chest, the lift of your spine, the posture, how much more effortless it is to stand up tall, for our next pose we're going to use one block, it'll be a wide leg forward fold, we'll take the block down and use it at whatever height you need to use so that you feel you can keep a long straight back, that is important for this pose, I'll keep it at this level, we'll take the left hand down directly below the heart and bring the right hand onto the sacrum, so I'm having my palm on the sacrum, fingers face behind me, push down through the left hand, roll the right elbow, I'm going to do that a few times, chest turning back down, I push down through my left arm and then roll the right elbow back, you want to press the right hand against your sacrum so that you get that leverage to turn open from the shoulder and chest, release, one more time, push down to the left hand, turn your chest open, pressing the right hand against the sacrum to roll open the chest and shoulder and release, let's go to the second side, right hand down just below the chest, we'll bring the left palm to the sacrum, my fingers facing back, push down on the right arm, turn your chest and as you press the left hand it allows you to turn the shoulder back, release it down, same again, press down through the right arm, left palm presses against the sacrum and that turns the shoulder open, last time, pressing down on the sacrum, turning the chest and hold there for a breath or two and then we'll bring it back down, to come out, heel toe your feet together and we'll come up to standing, once again, feel the effect of the pose in the body, why we do the poses, to be able to have that feeling, from here we'll move into a down dog, take a moment to feel your body in this downward dog and specifically the shoulders, how the shoulder blades connect to your upper back, the space in your neck, take notice of that for just a moment and lower your knees down and take a pause, we're going to do something special to one hand and get to feel kind of a difference that how you place the hand makes in the shoulders and chest, let's do it with the left hand, you'll take your right hand, grab the thumb, lift and lengthen it and then hook that lengthened thumb back to your mat, then the index finger you grab it, lift it, lengthen the skin and hook it, middle finger, lengthen, lift, press it, ring, press it, pinky, press it, so you feel the whole surface of the hand and the fingers are well spread but with the other hand we're just going to kind of let it participate halfway so you can really feel the difference in this, from there keep that left hand well connected to the floor, right hand sort of half and halfing it and come up again and feel the distinct difference in your ability to access your body from right hand to left, feel the chest, feel the shoulder, feel the line and the energy of the two arms, come down and rest. My hope is you felt something pretty special there from the energized hand, we'll do the best we can to open the right hand just like the left and do one more dog pose, keeping both hands very well spread, once again come into your pose, there's that even balance that we're looking for, the energy and length that we can get out of the arms and chest and then come down and rest. For the next pose, widen the knees a little wider than your torso width and bring your feet together, we'll post up the left arm on the floor and we're going to turn the right arm underneath this, relaxing your right shoulder and the right side of your head down into the mat, take some breaths here, you might try lifting up just a little bit and see if you can get that right shoulder blade a little further through, if it's not happening for you today don't worry, if you feel like you have the freedom to do it, we can take the left arm up and open the chest, a few more breaths, notice the energy in the hands and then bring it down, press yourself up and out. Second side, taking the left arm through, turn your chest, turn your chest, turning the chest will bring the left shoulder and ear or side of the head down, pause there, take a few breaths, if you'd like to lift up and try to get that left shoulder blade a little bit further underneath and then if you feel comfortable and stable to take the supporting hand up, give it a shot, the reason for taking the hand up is to pull the chest up into the pose a little bit more and then release your hand down to support you, press up and out, for the next pose we'll be lying on our side with knees bent, if you'd like to use a blanket to support your head you can grab a blanket for that, here we are lying on our side, so we want the knees bent to 90 degrees and the hands straight out in front of the chest, from here keep the knees and the hips where they are, open your arm up and watch it with your eyes and then let it fall behind you, take some breaths here, you may feel a nice stretching sensation in the chest muscles, shoulder muscles and we want gravity to do most of the work, no pushing or pressing into the floor just letting the breath and gravity take our body in, smooth long breaths, one more breath and then raise the arm up and close, we'll press up and come over to the other side, down on your side knees bent 90 degrees, arms straight out in front of the chest, raise the right arm up, watch it with your eyes as we turn back, here again I'm not pushing or forcing I'm letting my breath and gravity do the work of opening up and again you may feel that chest stretch or shoulder stretch, I will mention that if your shoulder does not like this position you can bend the arm and rest the hand on your rib cage and this takes the pressure off of the shoulder, still you get that beautiful spinal twist, chest opening and over time as the body opens up you can express the full pose, bring the arm up and exhale close your twist, I'll press the body up to sitting and we're going to work our way into Shavasana but I've got a special Shavasana for you today, the idea is we're going to fold the blanket from that classic yoga position just like this and we're going to fold it lengthwise, that's blanket number one, as always you want to fold your blankets as neatly as you can, blanket number two we're going to make a T shape right on the end, right about there, this is going to help open up the chest, allow our breathing to deepen, it's going to open up the diaphragm and I think you'll find it's very very calming, to set it up we'll start with the hips a good hand span away from the blankets, we don't want to sit down on the blanket then slowly lower your body down, blanket will come underneath the rib cage and then adjust the blanket for your head so it feels supportive of your head and neck, if you find that the blanket setup is such that your head falls off the end you might use another blanket under here to support the T shape that we've created, take a moment to tuck your shoulder blades a little down away from your neck and unfurl your arms and you'll be able to see how open the chest is from this position, one by one lengthen your legs, relax any energy that's in the legs, let them roll open and for this shavasana take notice of how your chest is open, you may find a softness in the abdomen that you're not used to, a passiveness, from our work today you might find that taking deeper breaths has become easier because of the pliability in the chest, can you feel how that chest moves expands open with your inhales, for this shavasana if you take a few extra seconds for your inhale and for your exhale aim the breath to be smooth, soft and rhythmic rhythmic means like a sine wave, smooth movement all the way in, smooth movement all the way out.
So, I'm going to take a breath in and I'm going to take a breath in and I'm going to take a breath in and I'm going to take a breath in and I'm going to take a breath in and I'm going to let go of any extended breathing, return to normal breath, rest your hands on your tummy, one leg at a time bend your knees and stand your feet on the floor and softly turn yourself over to the side off of the blanket setup and it's nice here to bring your knees up a little closer into your chest to round out any of the back bending from the shavasana. Take a few breaths here and gently press yourself up to a sitting position and find any easy sitting position for you, close your eyes and place your attention in your chest. See if you can perceive any change from today's lesson. Namaste, thank you for being here with us, we'll see you next time.
Yoga Rx: Nathan Briner
Comments
I’ll be creating more in the near future. Anything you’d like to see covered?
You need to be a subscriber to post a comment.
Please Log In or Create an Account to start your free trial.
