Description
About This Video
Transcript
Read Full Transcript
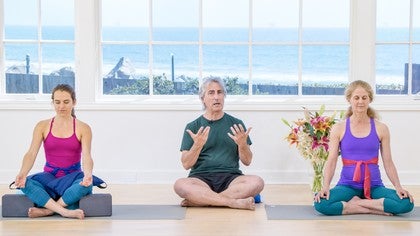
Hi, we're here with Ilana and Betsy to do a little ujjayi practice, ujjayi pranayama, the conqueror's breath as it's commonly known. You might be aware that the ujjayi breath that we do nowadays is a modern version of that practice. If you look in the old texts, you'll see that ujjayi is a slightly different practice, for example in the Hathapadipika, the inhalation is taken through both open nostrils but the exhalation is made only through the left nostril. There's a little bit of difference in the old texts, it's for ujjayi. And what we're going to also show on this particular practice is how to use a thera-ban, T-H-E-R-A-B-A-N-D, they're available online, pretty easy to find.
And they're about four feet long or so and they come in different colors which indicate different resistances, and I don't really know which colors are which but there's a table online that you can tell, and I would generally say that you get sort of a medium level of thickness to work with. So Ilana has hers on already, she's going to hold on, just sit here for just a moment, and Betsy's going to take hers, as you can see Ilana's thera-ban is blue and Betsy's is red, and what you do with this is you bring it around the back of your torso, try to keep it spread out rather than letting it get all folded up, and you bring it around the bottom rim of your rib case which of course is the outer rim of your diaphragm as well. And since your ribs are a little bit lower in the back of the torso than they are in the front, the band will be slightly angled from below in the back to above in the front. And then what you do is you expand the ribs with an inhalation and snug the band around the rim of the rib case and then let the breath out. Now if you would just turn around to show what that looks like in the back, and then you can see that she's managed to spread it out very nicely, and then thank you very much that it will work very well.
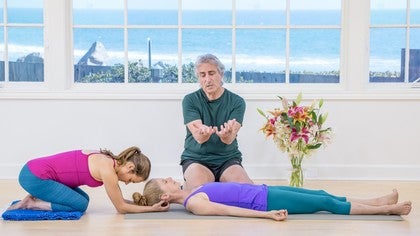
Now what this is for is to get a feel for the diaphragm which is of course the primary breathing muscle, 75% or so of your average everyday breathing is done with the diaphragm. And when you look down from above on your diaphragm it has kind of a kidney bean shape, but for the purposes of this exercise we'll pretend that it's circular in shape. And the center of that circle is where the imaginary friend's spine, or the energetic friend's spine, which we're calling the sashumninadi is passing through from the perineum to the crown. So if you both would get yourself situated, we have Betsy on a couple of blankets, and we're going to have her work with some blocks and sandbags to help release the groins. Now the blocks are placed underneath the thighs, and I want the blocks more or less, the long axis of the block more or less perpendicular to the line of the femur bone, you'll have to play with that a little bit.
And you want to support the knees a little bit higher than where they could ordinarily be so there's not really any pressure in the knees when you put the weight in place. Then of course the bags go across the groins, it really doesn't do any good to put them anywhere else but across the inner groins where the thighs join the pelvis. Very nice. And then again you have a choice, you can see that Betsy has her palms down, which is a little bit more of a feeling of grounding, and Alana has her palms up, which is a little bit airier feeling, a little bit lighter feeling. And then we'll begin, and as always there's really three stages to the breathing practice.
The first stage is to look and to see what the breath is up to for the day. The second stage is the formal practice where you do the breath that you're working with or the breaths. And then the third stage is to go back and look at the breath again to make sure that whatever it is that you did in the formal stage was salubrious, was helpful and not harmful or irritating. This is a really important aspect of the breathing practice, especially when you start to sit. If you become irritable or frustrated or angry, it's extremely important at that moment to completely stop for the day to lie down and do Shavasana.
If it happens a couple of times, it's nothing to worry about. But if it happens consistently, if you continually feel frustrated or angry or irritable, then it's time to figure out what it is you're doing that is not helpful. And it's a good time then to consult with one of your regular teachers to find out if there's anything that they can help you with to make the breath a little bit happier. So the two helpers are simply sitting and observing the inhalations and exhalations. Not doing the ujjayi or the japa mantra quite yet, just breathing naturally or as naturally as you can in this situation.
And then you want to, with these TheraBands on, start to get a feel for where the band passes around your rib case. Now normally when we breathe, we're mostly conscious of breathing into the front of the torso, so you'll feel the front ribs moving pretty easily. What's a little bit trickier is getting the side ribs and the back ribs to move, particularly the latter. So what this TheraBand does is create a tactile aid and it helps you to feel the entire circumference of the rib case, which of course again is the outer rim of the diaphragm. Now what you'll feel at first probably is that the front half of the diaphragm is moving quite freely.
And the back half of the diaphragm maybe doesn't feel like it's moving much at all. So you have to direct a little bit more attention into the back of your torso and start to move the back part of the rim as much as the front. So can you both now visualize your diaphragm as a circle? In the center of the circle is where the imaginary front spine passes through between the perineum and the crown. Take an exhalation and then on the ensuing inhale, begin to expand that circle evenly out from its own center.
Now what you'll feel perhaps initially is it kind of like, I compare it to an amoeba like movement, you'll inhale and part of the diaphragm will move and then part of the diaphragm will catch up and then part of the diaphragm will move and so on and so forth. In other words, the circle won't expand evenly. So you have to sort of slow things down a little bit and just, you know, just be very patient and work again to create that even circular expansion and contraction on the exhalation of the rim of the diaphragm. You won't do this the first time out or the second time out or the third time out. It will take a little while to get established although there's no real timetable for anyone.
And then as you do this exercise, as always, you'll find the breath slowing down which is exactly what you want to have happen. And after a while, then you can start to focus on the exhalation a little bit more directly than the inhale. So as always, you let the inhalation come to you. You sort of step back and the inhalation, it breathes you. But when you get to the exhalation, then you want to step in consciously.
I don't like to use the word control when you do the breathing. I like to use the word cooperation. So on the exhalation, you again let the breath out very slowly. Mr. Iyengar uses the word reluctantly. So the exhalation will then become a little bit longer than the inhalation in duration.
And then as always, we come to the end of the exhale where we come to the pause. And again, it's not a retention. We're not doing kumbaka quite yet. We're just resting and observing. This is really a precursor to retention, and you want to observe what happens to the brain when the breath comes to a stop.
And now I'd like to add one more small exercise to this breathing practice. And I'd like just Betsy to do that as the more experienced student. And what I'll ask you to do is to take her palms and rest them against her lower belly, that is between the pubic bone and the navel. And we'll have her breathe as she normally does for a while. And what you'll experience is that on the inhalation, the belly will expand.
And on the exhalation, the belly will contract the erectus abdominis muscles firm on the exhalation, as you know. And I wanted to pay particularly close attention to what the muscles feel like at the end of the exhalation. In other words, when the muscles are contracted, which helps the breath to be pushed out of the lungs. So you can see from here that the belly is indeed expanding on the in-breath and then contracting on the out-breath. Now what I would like you to do is to take an inhalation, feel how the muscles expand into the hands, exhale, firm the belly, feel the hands moving in slightly.
And then on the ensuing inhalation, hold the belly where it is and inhale. Very good. And extending the rim of the diaphragm, keeping the lower belly between the pubis and the navel firm. Nicely done. And then a slow, smooth exhalation.
Now take a couple of normal breaths, we'll try that one more time. We'll let her breathe a couple of times easily. Now again, inhale, you can see the belly expand, and exhale, firm the lower belly. That pushes the breath out of the lungs. Now again, hold the belly firm, inhale, the upper abdomen continues to expand, yes.
And then exhale slowly. Very well done. And then everybody back to everyday breathing. So step back, have a look. How does that feel?
Can you feel happy, can you feel satisfied? You can push yourself in asana a little bit beyond the normal limitations. But in breathing, it's not a good idea. You want to always be within your safety zone of breathing. The breath is a little bit subtler than the physical movements.
You have to be very careful how you work with your breathing. Very nicely done, they both look like they did a stellar job in this particular practice. You can open up your eyes, you can take the bands off. We'll ask Ilana to slide the bags off of her thighs down onto the floor. Take the blocks away and you can both stretch your legs forward in front of your pelvis and bounce your knees up and down the floor a few times.
Well done. This is the beginning of Ujjayi Pranayama. Thank you very much.
Pranayama & Meditation: Meet Your Breath
Comments
 Kate. He is truly wonderful and masterful. Glad you found him here! His show, Homage to the Source, brings his book, Original Yoga, to life.
You need to be a subscriber to post a comment.
Please Log In or Create an Account to start your free trial.


