Description
About This Video
Transcript
Read Full Transcript
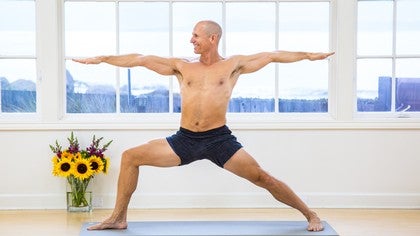
Om. Namaste. Nice to have you here. This particular sequence will be an exploration of the outward spiral that we worked on in the tutorial earlier. We're going to start out in mountain pose, bring the feet together, and just take a few conscious breaths with me together. Firm the thighs, lift the kneecaps, press the heels down, and start to lift in the inner body. Just take a few breaths by pressing down through the heels, opening the chest, and we'll start warming things up with a cat and cow pose done in standing. We'll separate the knees and feet a little bit, place the hands on the knees, and we'll start doing up and down spine. To give you another view of this, we'll take it from the side. Try to work the entire spine, tailbone moving up and down, lower middle and upper back moving, and the head being part of this process as well. A good breathing pattern for this is to exhale when spine goes up, inhale when spine goes down. A couple more with me. Come on back up, and we'll do a groin stretch next. We'll take the legs a little bit wider than hip width, turn the toes and knees out. We'll take the hands to the inside, fingers down, we'll start to do this stretch. Turning a little bit to one side with a chest, I'm going to press open the right knee. Come back to center, I'm going to press the inside of the left leg, turn. The work here that we're after is gently elongating the groin muscles, opening the hips, and of course getting a nice twist for the spine. Let's get a few more. Inhale to center, exhale to the side. Let's get one more each side, helping to press open the knee, turn to the side, exhale, and one more time. Inhaling, exhaling, and turn. And then come on back to center and bring the legs together. Next pose will be a ragdoll pose where we'll separate the feet about hip width, soften the knees, and hang down. In ragdoll pose, you can grab your elbows, take some nice deep breaths to relax your spine over the legs. It's nice to bend the knees a little bit more than you think you should here so you can totally relax your back and fold deeply over the hips. Let's take a few more breaths here with each exhalation, relaxing the spinal muscles, folding over the hips, soft head, soft neck. Last deep breath. To come up, you can place your hands on your knees, lower your bottom, lift your chest and head nice and easy, and let the blood come down. Take a moment there and come all the way up to standing. Our next poses will be some of the standing poses, so we'll take a block just in case we need to bring the floor up to meet us. We'll start with a block on the outside of the right foot, take a wide-legged stance for triangle pose, and here's where we really get to work on the things we learned in the tutorial. We'll start by turning the left foot in and the right leg out 90 degrees. As we learned, we'll turn the pelvis just a little bit. We have external rotation of the thigh and big toe contact. Take a nice deep inhale and extend the arms. On your exhale, keep that external rotation of the leg, sacrum and tailbone down. We'll take the hand to the block. Now, if you find you don't need the block, you can turn the block down any number of levels or set it off to the side and take the hand to the floor. You judge. Take some deep breaths here, and these actions we're talking about can be like a meditation. I can take my awareness to that big toe. Is it doing what I think it's doing? The external rotation of the leg, sacrum and tailbone down and in so that I can turn my chest. We'll take an inhale to come up, turn the feet in, and we'll change the block to the other side.
Walk behind the left heel and let's work the other side. Right toes a little bit in, revolve the left leg out in 90 degrees and stretch your arms. Take a nice big inhale. We're working on the external rotation. Exhale to the left side. Here again, let's do that meditation, pushing our awareness, our consciousness through the body to feel. Left big toe mound anchored to the ground well, external rotation of the left leg and thigh, sacrum and tailbone down and in so that I can fully turn my chest open. You can move the block to any height that works for you. Let's take a few more deep breaths, focusing on our actions. And then inhale and come up, turn the feet in. Let's walk the legs together and take mountain pose both to refresh the body and to feel the body. Press down through the heels, lift the spine. Let's take a few breaths right here with me. Our next pose will be warrior pose. We won't need the block, so let's take the block out of the way for just a moment. Take a wide legged stance. Start again by turning the left toes in and the right leg out 90 degrees. Let's work the things we know, pelvic position, external rotation, big toe mound. Stretch the arms. Take a big inhale, keeping the external rotation of that right leg. Here we go, warrior pose. Press down the outer edge of your right foot to help encourage that external rotation of the thigh. And one of the things in warrior pose we work on is eventually to get the thigh parallel to the ground. If your hip or knee doesn't allow that, then of course you're up a little bit higher. But over time you want to challenge the possibility of getting that leg down to parallel. Take a few more breaths with me and look over my right hand, fully do the pose. And let's come up. Rest the arms for a minute. We'll turn the feet to center, take a breath or two. To the left side, right toes in and left leg out 90 degrees. We'll stretch the arms. Let's do the work we know. Little pelvic shift, so we have the freedom in the leg to externally rotate. Big breath in, exhale, and we bend. Here again, pressing the big toe, feeling that external rotation, sacrum and tailbone in. Let's take a look over the left hand to complete the pose. Challenge yourself if you can go deeper down to a parallel left thigh. Challenge that possibility. And then inhale and come up. Turn the feet to center. Relax your arms and let's heel toe the way all the way in.
Stand in mountain pose. Again, refresh yourself. Breathe. You can move the legs if you want to. And then for a moment, let's do the full pose by anchoring down into the floor and create that inner space. Next pose is side angle pose, the pose known as Pajos Konasana. For this, you may need a block again. So I'll bring that in and place it behind the right heel. Wide leg stance. Turn the left toes in, revolve the right leg out 90 degrees. This is a lot like warrior pose and triangle pose combined. We'll stretch the arms. Let's do the leg work, external rotation. Breath in. Exhale, bend. Extend the trunk over the right leg and take your hand to the block. If you'd like to take the block lower, if that suits you, you can do any level or even the floor if the floor is available to you. We're gonna take the full pose here by turning that left palm over the ear and extend. Let's hold here. Our meditation again, feeling that right big toe mound well anchored. The external turn of the right thigh. Sacrum and tailbone in and you'll see it now so that I can fully turn up and look at the sky. One more deep breath. Let's inhale to come up. Turn the feet to center, relax the arms and we'll change the block to the other side. One more time, we'll take the right toes in, the left leg out 90 degrees. Pelvis position, external rotation of the leg, big toe contact to the floor. Let's stretch the arms. Breath in to prepare and then exhale, bending the knee, extend the trunk over the left leg. We'll take the hand to the block, any level that works for you. One trick you can know if you've taken it too low, sometimes your tail will begin to stick out. That's your cue again that we've lost that part, you might need to come back. There I can hold it quite well. Then we'll do the complete arm by turning the arm, palm overhead and then stretch the arm. Good. With the sacrum and tailbone in and the thigh spiraled correctly, I can turn the chest and look up. Let's take some breaths here. Meditating on those actions. Let's take a nice big inhale to come up. Turn the feet in, relax your arms, walk the legs together.
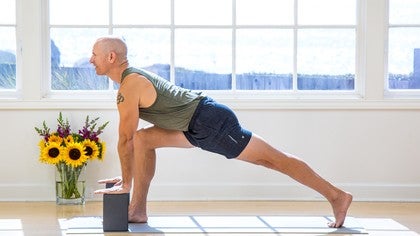
Tadasana. Shake them out if you need to, shake them out. Breathe it out if you're getting a little short of breath. Just take a pause here. Feel inside that body. What's going on in the legs? What's the space in the trunk like? What's the space in the head like? What are you hearing going on in there? Our next pose is called half moon pose. It's a bit of a balancing pose, but we're going to put all of this together. You're going to need a block again. We'll take a wide legged stance and we'll go through this one step by step. We'll take the block to the outside of the right heel. You'll turn your left toes in and right leg out. Everything we know comes into play. Pelvis, spiral of the thigh external, big toe mound. Stretch the arms. Inhale and exhale, bend and take the hand down to the brick. Let's put this hand down so we don't even have to worry about it. Then we'll step by step go into this pose together. First, stretch the block forward and walk the back leg in a little. Pause right there. Here are our points. Toe. Thigh turning out and very important in this one, sacrum and tailbone down and in. Do the same thing again. Little stretch of the block. Walk in a little. Stretch of the block. Walk in. Keep that sacrum and tailbone in. Here we go. Lifting the back leg off the floor. Here again we work to the best of our ability. Keep that big toe mound down. External spiral of the right thigh and sacrum and tailbone in. Take one more breath. Bend the knee. Come down gracefully and bring the block back and we'll stand up. Turn the feet in. We're going to shake that one out. Just relax a little. Walk the legs out. Let's try the second side. Open up the legs. We'll take the block to the left side. Let's go through it together again. Right toes in. Left leg out 90 degrees. Stretch your arms. Remember big toe. Spiral the thigh. Pelvic position. Sacrum and tailbone in. Big breath and exhale to the left side. We're going to rest the right arm down so we don't have to worry about it. Stretch the block forward. But before you move, sacrum and tailbone in. Breath in. Exhale. Back leg in a little.
Blocks extends away. Sacrum and tailbone in. Walk in. Block. Feel that weight all on the front leg. Here we go. Lifting up. Let's hold the position. You can work in the position to do all the things we're talking about. Big toe. Spiral of the leg. Sacrum and tailbone in. Doing your best to balance. A few breaths and then come down. We'll bring the block in and come on up. Turn the feet in. Walk the legs together and a well deserved shake out after that tough, tough pose. When you're ready to bring it to full Tadasana, when your breath is settled down, please join me here in Tadasana. We'll stretch the heels down and just breathe. The next pose is Utkatasana or chair pose. And we're going to do that to bring things back to the midline. I'll turn to the side so you can see and you can either choose arms up for this or you could keep your arms down by your sides. I'll show with arms up. Take a nice breath in. On your exhale, bottom goes back. Weight stays heavy in the heels. We're just going to hold here. A few nice deep breaths. Again, check in. Weight is in the heels. And then release the arms down. Come up to standing. Shake out those legs a little bit. We get one more of these. We'll take the arms up. Nice breath in. And exhale. Sitting the bottom back. Knees come a little forward. In the deepest poses, we get all the way down here towards thighs parallel, but you're going to determine what works best for you. A couple of deep breaths while you're here. Challenging pose for sure. And then release your arms down. Our next pose is going to be downward facing dog. So we'll just step right into that. Hands to the floor and we're going to come into a plank pose first to get the distance for down dog. Here we are in a plank and now we know we're at the right distance. I can push into downward facing dog. Pressing back in a downward facing dog. Let's raise the heels together. Lift the heels as high as they can go and energize those leg muscles, thigh muscles to open the backs of the knees. Keeping the leg muscles well lifted, slowly let the heels back down. Soften the head, soften the neck. Take a few more deep breaths with me. Downward dog can be a very nice recovery pose. If you need to come down to the child's pose anytime, you can do that. And then we'll rest the knees down on the ground. So bring the hands back to us just a little bit for an easy couple cat and cow. Spine going up and spine going down. Again, the nice breath cycle with this is to inhale with spine going down. Exhale when spine rounds up to the ceiling. Two more. And one more. From here, you want to grab a couple of blankets to make it easy for you to sit up and move through the hip joints. I'm going to take two blankets, fold it in half and stacked on one another. And believe it or not, the neater you fold those blankets, the better your pose experience will be. So you're not worried about an uneven surface. We're going to extend the legs straight out in front and do a little something to help open up the body. A spiral of the legs. I'll take one hand under a hamstring, one hand at the groin and do a little spin. Groin down, hamstring out. We'll do the second side.
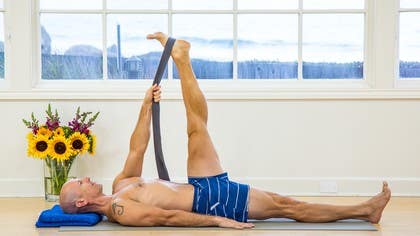
Hand underneath, hand on the inside and a little spin. And this just helps open up the groin muscles and lift the spine. We'll draw the right leg back first and bring the knee up toward us. First, grab hold of the foot with the opposite hand. So left hand grabs the foot, right hand on the knee. And we'll first just work on one, lifting up tall and two, drawing that right foot any amount in towards the opposite shoulder. I want you to pump this a little bit. Get the body used to opening up the knee. And this is our outward spiral. Lift up tall, draw it in. Then we're going to hold. And if you have the ability to bring the foot in a little bit more, we can rock the leg across. If it's available to you, you can hook the foot in the opposite elbow. It's not going to be available for everybody. Don't worry about it. You can hold it right here at the hand if you need to. Right in here. And again, we're going to get tall. And some have called this cradling the baby pose. Sitting up tall, take a few deep breaths. You may notice some stretching happening down here in the right hip, strengthening in the lower back, and then release. Extend the legs out. Sometimes when you do that pose, it's nice to come back in and spiral the legs. This is actually inward spiral that I'm showing you. And the second way, we'll take the leg in and draw the leg back. Right hand holds the foot a few times. Pumping the knee back, releasing. Pumping the knee back, and releasing. We'll pump the knee back. Practicing the second, which is to roll the foot across just a little bit. Roll the foot across. One more time. Roll the foot across. If you have the freedom to take the elbow around the foot, I'll invite you to do that. Otherwise, you might just leave it in the hand, holding the knee here. Two things we're doing. One, we're helping that leg externally rotate. Two, lifting the spine up. And remember, we're practicing that outward spiral here. Can you feel in your body your willingness or your ability to actually allow the turning of that thigh outward? Seek in there. See if you can find that feel. And then we'll ease out and let go. For the next pose, we're going to bring in a strap as well. It'll help us lift up the spine. You'll take your strap and open it up. We'll bring one leg in at a time. This is called bada konasana, or bound angle pose. Both legs are going to bend in and sit up tall. It's always very helpful to lean to a side and pull the skin and muscle of the buttocks back. This will help you lift your spine more and more. We'll take the strap underneath the outside edge of the feet, the pinky edge of the feet, and hold onto the strap as you see me doing here.
Depending on your knee flexibility, your hip flexibility, you can bring the legs in more and more, eventually bringing the heels right in next to the groin. So why do we use the strap? We're going to pull up on the strap first to draw the shoulders back into their sockets. I'm going to show that again. I'm going to pull up on the straps to bring the shoulders back into their sockets. You can see how that opens my chest. This also helps promote that outward spiral. In effect, it's like I'm bringing my feet up toward me. This draws the legs into their outward spiral. See if you can feel those things in your body. Let's do it together. Shoulders pull back. Chest is opening. You might even see my knees going down. They're outward spiraling right now. And let's just hold here. Take a few deep breaths. Remember, yoga is really all about feeling inside the body. The poses are just a way in. We'll take it just a little bit deeper, pressing the outer edge of the feet together. Feel how the buttock muscles become a little bit firmed. Pinky edges of the feet. We're going to press them together. Feel those hip muscles engage. And you remember our technique, sacrum and tailbone in. I'll do it now together. I press the outer edges of my feet, buttock muscles engage, and I watch the spine lift. Let's just hold here for a few last breaths. Feel inside that body what's happening. If the body is complaining in any way, you can adjust or ease off as you need to do. Set the strap off to the side. Take a moment to extend your legs. Let's do that technique of turning the thighs. Place the hands on the blanket. We're going to squeeze the knee muscles, the quadriceps. Squeeze there and lift your back. This is to relieve the knees and hips for a moment if any tension happened to accrue there. Lift your chest in a few deep breaths. This poses staff pose or dandasana. From here, shavasana, it's time. Come down off the blankets. Let's put them to the side, but if you can keep one for your head and neck, it's a really nice way to add a restful element into your shavasana. Come to the side. Lengthen your spine down. We'll adjust the blanket so that it's underneath the head and neck, but not underneath the shoulders. If you'd like to tuck the shoulders under just a little bit, rolling them down away from the neck, palms up, and extend your legs down. Allow the legs to relax one away from the other. Let your eyes close. Allow your breathing to settle. Take a moment to see if there's any tension in the legs, in the hip joints. Allow that tension to release, relax so the legs fully roll out to the sides. Let any tension go in your abdomen. Relax the ribs into the floor. Let the shoulders be heavy. Release and relax any tension around your facial muscles and around the eyes. Let the attention start to sink back away from my voice, your thoughts, any movement of the body. You may find a stillness and a quietness. There may be various movements of thought or body. Can you just stay in that quiet stillness? Can you just stay in that quiet stillness?
Can you just stay in that quiet stillness? Nice and softly, if you can rest your hands on your abdomen. Take a few breaths there with your hands on your tummy. One leg at a time, bend the knees and stand the feet on the floor. And turn softly over to your right side. We'll keep the eyes closed for now. And then using your hands, press up slowly away from the floor and find a comfortable seated position for yourself, any position at all. Take a moment one more time to go within with your attention. And just an inward feeling of gratitude to your body for allowing that experience to occur. Namaste and see you next time.
Yoga Rx: Nathan Briner
Comments
You need to be a subscriber to post a comment.
Please Log In or Create an Account to start your free trial.
