Description
About This Video
Transcript
Read Full Transcript
Om. Namaste. Nice to have you here. This sequence will be a follow-up for our tutorial we did in opening up the knees, creating that nice powerful leg energy from various poses. So we'll start today with legs together, tadasana. And let's review some of the things that we learned how to do in the last tutorial sequence. We're going to start by lifting up the toes, feel the thighs come back and press down through the heels. Just take a moment to experience that stability that comes from this pose. And then relax your toes and feel again that body coming forward like we learned in the tutorial. Let's do it again. Curl the toes up, feel the thighs come back and push straight down through those heels. Feel the leg energy and we'll hold that stability and gently release down the toes. And then relax and we'll do one more time and we'll add arms in this one. Raise up the toes, feel the thighs go back, press straight down through the legs, down through the heels. You feel that nice strong stability. Keep that lower the toes and then without letting the thighs come forward, we'll take the arms up. Let's take some breaths here. Keep that leg action, pressing down through the heels and extending the body up. Go within the body and feel that openness that comes from this work. And then release your arms, relax, shake out the legs for a minute. Let's try one more time. Toes first, curl the toes up, feel the thighs go back, press down through your heels. Feel that leg stability again, keeping the leg action. Knee caps up, slowly lower the toes down. And then again without lifting up, without moving the thighs forward, we'll take the arms up. Nice breath in and let's hold it with some breathing. Your job is that meditation on the leg actions to feel the stability and from that stability, feel the inner lengthening happen as you're taking your arms up. A few more breaths and then we'll let the arms down and relax the pose. The next pose will be a wide leg forward bend and for this we're going to use two blocks just to help with the hip and hamstring flexibility. The block height is going to be up to you. We'll take the legs out wide and I'll start with the blocks up nice and tall. In this position, our job is to do the same thing we did in mountain pose, tarasana. Let's start first by curling up the toes and see how that affects the legs. Lifting up the toes and there's that leg energy just comes right on, lifting up those kneecaps, pressing down through your heels. And in this pose, working to feel the openness in the backs of the knees. Let's just hold that for now, feeling into the body and then let the toes go. Heel toe to come out, nice way to come out, nice and easy on the back and hips. Pause standing position and we'll try another time. Legs out wide and then hands on the bricks. Now if you have the ability to take your hands all the way down to the floor without a rounding back, then you certainly can take your hands to the floor. If on the other hand you need your hands up on a chair for a little bit more support, that could be another prop you could use. I'll stick with the blocks for now, let's do the work. Toes up, thigh energy, opening up the backs of the knees, pressing down on those heels, feel that energy. And if you like, you can begin to bend the elbows. I'm going to turn the blocks down a little bit so I can bend the elbows, keep the legs strong and take the head down. And I have the ability to take the hands to the floor. You could join me hands on the floor or keep your hands on the blocks. Our intent again is to keep the backs of the legs open, feeling their strong pressure into the floor with the heels. Take a few more breaths and let's walk out of the pose together. You can bring your hands back on the block and then we're going to heel toe the legs in. Heel toe, heel toe. Let's come up into a mountain pose, let the body refresh, take just a minute. Toes up for just a moment, thighs back and press the heels down and let's stand there mountain pose. Feeling inside, that's such an important part of yoga is the feeling component. Good, next pose is pyramid pose. We're going to take it off to the side using the blocks again. I'm going to take them to their highest level and we'll start here. Again, if your back cannot be long and flat, even with the blocks, you might use a chair or if you can take the hands further down, you can do that as well. Our focus again here is opening up the back of the knees. Here's a technique we can use to do that. We're going to start to lift the toes and the foot of the forward right leg. Here I go, toes up, foot up and that helps get me into the back of the leg. Now for sure, there can be a lot of stretching sensations with this, so take your time with it. I'm working on opening up that leg and then can we keep the leg open and slowly lower the toes down. We'll pause there, nice long back and open knees and then to come out of the pose, press the feet down, we'll come up, bend the knee, we can step forward and we'll change the other side. Left leg back now. All right, here we go again, hands on blocks. You're welcome to take your hands lower if needed. Let's work on straightening that front leg, so if you tend to have the leg more bent, we can challenge it by curling up the toes, push through the heel, same techniques we've been using in Tadasana.
I've got the straightness of the leg, then I keep that and lower the foot back down, nice long back. Let's take a few breaths here and feel that foot and leg action into the floor, supporting the kneecaps, supporting the knees and then to come out of the pose, you can soften the legs a little bit and press back up to standing. Bend the knee and step forward. We're going to try that one more time with the opposite concept for those who hyper extend their knee. We're going to see if we can show how to work with that. We'll take the hands down, right leg forward, left leg back and as we discussed in the tutorial, there can sometimes be a tendency to just drop back. Here's that loose kneecap, here's the loose thigh. We're going to work with that now by bending the front knee just a little bit, push the ball of the foot down and stretch the toes forward. From that downward pressure and reach of the toes, then I slowly straighten the leg and this develops all that leg power and control. We'll hold there one more time in this side, taking a few breaths. Remember we're feeling the actions of the pose. Be present there and then we can let the knee bend. We'll stand up, bend the front knee a bit more and step forward. Let's take the second side. We'll step the right leg back, hands down to the bricks and again we're working on this to help prevent the hyper extension. So what we do, we'll bend the knee just a little bit, focus on pushing right on down in the floor with a ball of the foot and then stretch the toes forward. Pressing down on the ball of foot, keep the toes lengthening out of the foot as you begin to straighten your knee. There's our challenge right there. Keep the foot action and the knee drawing back and here we're going to hold the pose together. Taking a few breaths and you keep drawing the mind back to that consciousness to the work of the foot and that nice strong stability around the leg. Feeling into the body. One more nice deep breath and then we'll bend the front knee and lift up out of the pose and step forward.
Our next pose will be a lunge. We'll call it a high lunge warrior pose working with the leg. So we'll start by taking the hands down to the brick and we'll step back. Right leg forward, left leg back. First thing we'll do will the back knee lifting, thigh lifting and we'll keep that in the awareness as we come up into the high lunge. Taking the arms up. Our challenge here is to keep that back leg well lifted. Take some breaths as you focus in on that energy. I'm pressing down on the ball of the foot, knee cap lifting, left thigh lifting all the way up into the hip. Feel how that supports your spine up. How it even relaxes the face. And take the hands down. Let's lower the back knee down. Make an easier transition. Right leg back, left leg forward. Here we go again. Curl the toes under and lift the back knee. Start with that leg energy. Lifting up, knee cap, thigh all the way into the hip joint. Here comes our lunging pose. Arms up. Again, start with the consciousness in that back right leg. Lifting the shin, lifting the kneecap and then all the way up into the hip joint, you feel that lift.
See how that lift, feel how that lift supports your inner body, the trunk, the spine, all the way up to the top of the head. Take one more nice big breath here and then ease down those arms. Again, let's lower the knee. Take a little break here. Catch your breath. The next pose will be a kneeling lunge twist. We'll start with the left leg forward, right leg back. We'll take the blocks, one block away. We'll keep the other here. We're going to come into our lunge. And in this case, we can use the block or discard it if you'd like, but we can keep the right hand down. We'll start with the left hand on the knee. Lifting that back leg, everything is the same.
Lifting and charging that knee and thigh, we're going to begin to turn. Then keep that back leg as you turn open the chest. Try with me and see what happens. Now that you've done it with the lifted leg, if you just let a little energy out of that back leg, you feel how the whole pose inside begins to shrink. Charge up that back leg again and feel how all the way through the body you can see, all the way through it opens up just from the lift of that back leg. And then we'll turn the body down, release the back knee, step back and we'll change sides. We'll bring the right leg forward, left leg back, and bring up the back leg like we know how to do. Pressing the ball of the foot, raise that back knee, and then all the way up into the hip joint. Using the block at any level that's appropriate for you, here we go. From the back leg, I lift the back leg and turn. From the back leg, feel how the lift of the leg produces the twist of the body.
Arms actively reaching away from one another. Nice, long, smooth breath. Good, and then release the trunk down and lower the back knee. Let's step back and just take a moment, catch the breath, relax the body a little bit. And let's take a minute to stack the blocks away and we'll rest back in child's pose. You can cross one hand over the other, let your head down, and it's a great opportunity to recover your breathing and relax the legs. So nice, slow breaths, not just into the front of the body, but even the back of the body, should open with the breath. One more nice, low breath.
And then we'll press up slowly. Our next pose will be seated, so we'll use two blankets just to give ourselves a little extra height here, and you'll also need a strap for this. We'll go wide legs, and we've got our strap, and let's start by adjusting the body so it's most available for movement. So we reach underneath one hip at a time, and we move the skin and the muscle back so we feel the pinpoints of the buttock bones. We'll take it to the right side first. We'll bring the strap around the right leg. It'll be the left hand that holds it. So here we have a twist. We'll start by pulling on the strap. You can see how my body begins to turn, but as I pull on the strap with my arm strength, I want to reach out with equal strength of the leg. So let's try that together. I'm going to pull on the strap, and I'm going to reach straight out of the leg into the strap.
This creates my ability to firm the leg muscles and open the leg. Open the knee. Here's our twist. Both legs are active. You see my feet are pointing straight up and down. As always, nice long, slow breaths. And then we'll ease off and change the sides. Strap around the foot. My right hand holds the strap. Left hand behind me on the blankets.
This helps me get taller. So I pull with that right hand. You see that initiates my twist. I reach out of the leg into the power of the strap. Remember that reaching, as we've done in the standing poses, as we did in mountain pose, that's what gives the leg energy to open up the joint here, to press the thighs down. Let's do the twist. Long, slow breaths and that meditation of feeling your actions. Recharge them with your mind. And then come back to center. Take the strap away for a minute and place the hands behind you on the blanket. Roll the shoulders back. Press down through those arms to lift your trunk length up. With the trunk length lifted, muscle energy onto those quads. Pressing the thigh bones down. Just pausing here with that lift.
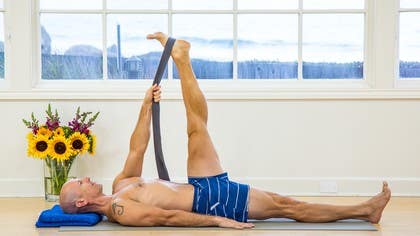
Can you create an openness, a receptivity, a softness in the abdomen so it can actually receive that lift? Bring your mind into that area. Soft eyes, soft face. And then ease off and let go. Nice way to come out of this pose is to lean back, grab the inner knees and use your hands to bring the legs up. Our next pose will lie down on the back. One blanket for the head will make it feel nice and comfortable. We'll take the other blanket out of the way and you will need a strap for this pose. Have the blanket behind your head and neck but not underneath the backs of the shoulders. First pose, we'll take the strap around the right foot.
The left leg is going to be down flat on the floor. This pose is called Supta Parangusthasana, single leg stretch. The work we're going to be doing is the same. That's the sequence. That's the linkage of this work in all of these poses. So the first thing we'll do is to use the arms to pull down on the strap. You saw me slide there but that's going to keep the hands still. That's the energy I'm going to use. So I'm pulling the arms toward the floor. The next step is to push the leg straight up into the power of the strap and then you'll see the leg change. You can see me opening the back of the leg and for sure there will be some stretching sensation back here. One way to work with that is to actually let your leg away from your body a little bit. There's no reason to have too intensive of a sensation there. We want this to actually feel good. So again, we're pulling down with the arm. I'm pushing up with the leg so that I can feel that energy open the back of the leg. Let's hold it. A few nice breaths and that continuous meditation on the actions we're working with. Abdomen soft and just for the last two breaths recharge that leg energy. Arms work the strap, press the leg up and open the back of the leg and then let's take a break. Let that leg go. It's nice to let the legs come down together for a minute just so you can feel the difference between the two sides. The blood flowing through the one side, the length of the two legs after the pose. Let's do the second side. Left leg comes up. We'll put the strap around the bottom of the foot. Right leg down flat and it is energized. It should be working into the floor. Let's do the work. We'll pull with the arms to anchor that leg. We're pulling the leg down into the socket. We respond by energizing the leg up into the strap and that helps us to press that thigh bone. There's all the same stuff we've been doing the other poses. Press the thigh bone to open the back of the leg and let's go into that meditative state where we observe the actions and feel the body's response. Pulling with the arms, pressing up with the leg into the strap and then pressing the leg open as we hold.
A few more breaths, soft abdomen, and then ease off your pose. One more time, let's take the legs down and just get a sense of how that pose interacts with the body. Feel the blood flowing through the legs. We'll bring the legs up and just take a moment to draw the knees into your chest. Relax your back into the mat and then release and let go. Our next pose, we'll take the blanket out from underneath for a moment. We're going to turn tummy down and this will be as a counter pose to all the other poses we've been doing. We'll rest the body down and your head on your hands. Join the two legs together and then both legs together we're going to lift up. Hamstring energy, glutes, hips, all working together and then let down. Very commonly in this pose, people like to bend the knees and bring the feet up like this and do the pose in this way.
But with our lesson today, we're learning how to actually open the backs of those knees and lift more from the hip joint. So if we keep the feet down for a moment, lift with the quadriceps, the thighs away from the floor, then keeping the backs of the legs open, we bring the leg up and then relax back down. Let's try that again. We're going to keep the feet on the floor to start. Energize those quadriceps, firm the quadriceps, lifting the knee joint a little bit and open the back of the knee. Pause there for a second and feel that space. Then with the meditation on the openness of the back of the knee, here we go, we're lifting the legs off the ground. Five, four, three, two, and set it down. Last one together, feet stay down, lifting the knees. A breath in, exhale to initiate the pose. Here we go. Open in the back of the knee.
Experience that. Holding and then easing down. From here, let's take an easy press up, hands and knees for just a moment and moving the back just a little bit after that easy back bend. Up and down a few times, free up any muscle tension and then knees apart, slide the feet together. We'll sit back into a child's pose once again. Take a moment to draw the breath down into your lower back. See if you can feel the low back receive the breath. Feel the low back inflate with your inhalation. One more time, feeling for that low back movement. And then from there, we're going to make our way into Shaasana.
So we'll take the blanket once again for the head and neck. Lengthen the body down onto the mat and adjust your blanket so it's underneath the head and neck, but not underneath the shoulders. Take a moment to tuck the shoulder blades down the back a little so the back of the neck is long. Release your hands, palms up, and one by one, extend your legs. Let's take all the energy out of the legs, relax them, let your eyes to close. Check to see if there's any energy left in those hips that you can slowly ease off, enough allowing the legs to release and relax out to the sides. Release and relax your abdomen.
Allow your ribcage in the lower back to settle easy into the floor. Let the shoulders be heavy. Allow the throat to relax. Relax the facial muscles. And so we use the term taking the backward step.
And you can begin taking the backward step as though to step away from the sound of my voice. If you have thoughts happening inside, you just take a backward step away. Even the physical sensations of your body, the little hum and glow, a backward step. And you continue to take that backward step until there's a recognition of a peace, a quietness, a stillness that was just waiting for your return. And rest in that stillness.
And you can rest your hands on your tummy. One leg at a time, you can bend the knees, stand the feet on the floor. Take a slow, soft turn to your right side. Rest on your side with either the blanket or your hands under your head. And then using your hands, gently press yourself up away from the floor and find a comfortable, easy sitting position.
Pause with your eyes closed for just a minute and take the attention inside once again. Recognize that still quietness is present even here. Om. Namaste. I look forward to working with you in the next routine.
Yoga Rx: Nathan Briner
Comments
Grateful for your gentle teaching 🕊
You need to be a subscriber to post a comment.
Please Log In or Create an Account to start your free trial.


